Many ways to share ideas,
writings, or opinions to the public, including by utilizing social media or
other networks. Likewise with blogs, posting shared to social media is a source
of traffic. And to attract visitors from social media, we need a tool or widget
that can make it easier for visitors to share our writing if they think our
writing can be useful for others.
Called the share tool or
social share tool which is a collection of tools to connect or share posts to
various social media which are usually in the form of buttons with various
attractive designs. With an attractive appearance, it is expected that visitors
will be more interested in sharing our writing, but of course the main factor
remains in the weight of the writing that can make visitors to share writing
without having to be told.
The AMP itself has
previously provided a button for sharing, namely amp-social-share, which is
quite helpful in making it easier to share text. And now for AMP HTML we have
added a share button from AddThis that we can use by displaying a counter or
the number of shares that have been made.
Of course this is good news
for AMP HTML users with the AddThis share button. Because with this we can now
display counters or the amount of social media sharing with eye catching designs.
AddThis share button also
makes it easy to customize the social media share buttons that you want to
display, including colors, shapes, and more.
Now I will share how to
install the AddThis share button with a counter on the AMP blog.
1.
First step
Please create an AddThis account HERE , for those who already have an account, you just need to Sign in to enter your AddThis dashboard.
2.
Second step
Please click the Tool menu, and click the Add New Tool button on the top right then select Share Buttons and choose the type Inline (lined to the side). If you have already made it, you just need to click on the tool.
3.
Third step
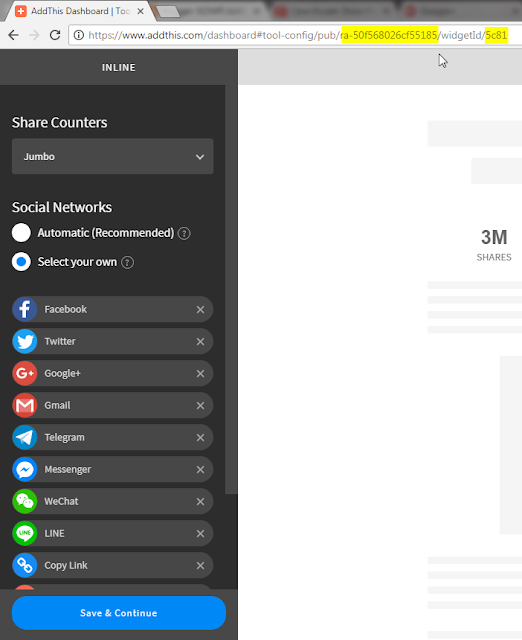
• Make sure the Jumbo option
for Share Counters
• The Font Size label is
26px and the Share Count Font Size is 14px
• For Style, choose Modern
Fixed-Width
• Button Size select Large
(32x32)
• And check Hide Network
Names
And keep in mind: After
display customization is complete, don't first click the Save & Countinue
button. But please first copy the URL of the page listed in the browser address
bar as follows. What I marked is the code needed for the next step.
After that, just click the Save & Continue button.
4. Fourth Step
Now please go to your blog's HTML Edit then save the following code above the code </head> or </head><!--<head/>-->
<b:if cond='data:blog.pageType == "item"'>
<script async='async' custom-element='amp-addthis' src='https://cdn.ampproject.org/v0/amp-addthis-0.1.js'/>
</b:if><b:includable id='shareAddThis' var='post'>
<div class='shareAddThis'>
<amp-addthis data-pub-id='ra-50f568026cf55185' data-widget-id='5c81' expr:data-share-media='data:post.firstImageUrl' expr:data-share-title='"Check out this article: " + data:post.title + " - " + data:post.url' height='63' layout='flex-item'>
</amp-addthis>
</div>
</b:includable>
Code ra-50f568026cf55185
(pub) and code 5c81 (widgetId) please replace with code similar to that in the
URL obtained in the Third Step earlier.
Then use the following code
to display the AddThis button, such as above the post title or below the post.
<b:if cond='data:blog.pageType == "item"'>
<b:include data='post' name='shareAddThis'/>
</b:if>To make it look neat, please add the following CSS to your blog's style amp-custom .
.shareAddThis{margin:0;height:53px;overflow:hidden;}
.shareAddThis amp-addthis iframe{margin-top:0;margin-left:-8px;}
@media screen and (max-width:640px){.shareAddThis{height:98px;}}
Done .... good luck.

